


Creating a simple WinForms Application
Here we will show how to build a very simple database application using NexusDB ADO.NET Provider with Delphi 2005.
Hint
If you don't want to create this example on your own you can find the complete source in the Examples\Manual\BDSWinforms subdirectory of your NexusDB installation. If you don't have this directory you download the examples from our web page.
Hint
For this example we are using the Northwind sample database, if you haven' already installed it please refer to Creating the Northwind sample database to do so.
Hint
All ADO.NET application are using the Direct TCP/.NET transport to communicate with the database server. Make sure it is enabled on the server!
Step 1 - Creating a new project
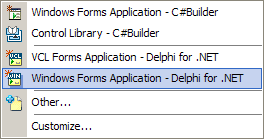
Start Borland Delphi 2005 and create a new project using the File \ New \ Windows Forms Application - Delphi for .NET menu item.
This will present you with a blank form.
Step 2 - Adding the DataAdapter
Select the NexusDB tab from the Component Palette and drag and drop a NxDataAdapter onto the form. If you don't have NexusDB on the Palette please refer to Adding the ADO.NET Provider to the Component Palette to add it.
Dropping the NxDataAdapter on the form will open the DataAdapter Wizard
Step 3 - Setting up the connection
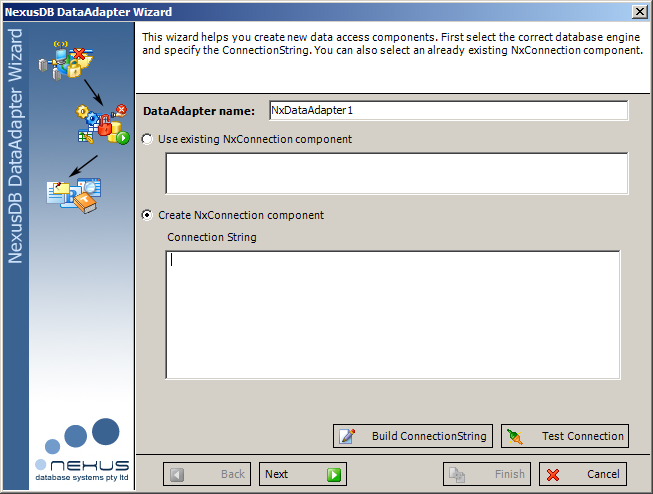
Here you can give your DataAdapter a different name. select an already existing NxConnection component and thus reusing it or create a new connection. Since we're creating a new project, we need to add a new NxConnection. Just press the Build ConnectionString button and the NexusDB ConnectionString Builder will pop up.
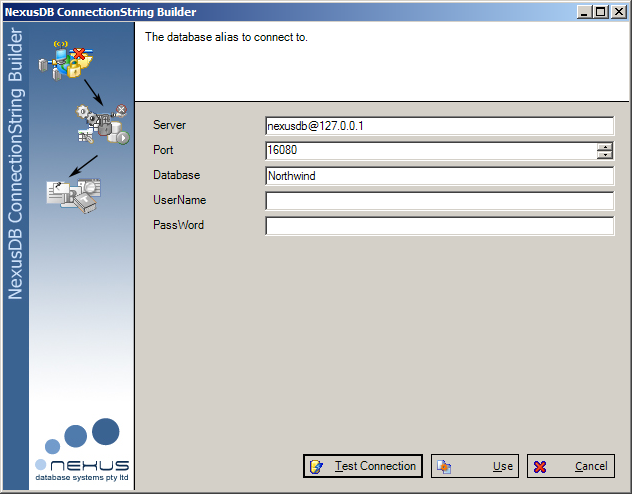
If your NexusDB server is running on a different machine, you'll need to change the Server to point to the correct IP address. You might also need to change the Port if you have changed the port settings on the server. If you've enabled the Secure Server option on the database server, you'll also need to supply correct authentication details here, otherwise just leave the fields blank.
Change the database to Northwind and press Test Connection. If everything is fine you should see a Connection Successful message. If there's a problem most likely your server or the Direct TCP/.NET is not active or you're pointing to the wrong server or database. Once you've successfully tested the connection, press Use to return to the DataAdapter Wizard.
You should now see the connection string similar to
[email protected];Port=16080;Database=Northwind;UserName=;PassWord=;
in the memo field. Make sure the Create NxConnection component radio button is active and press Next.
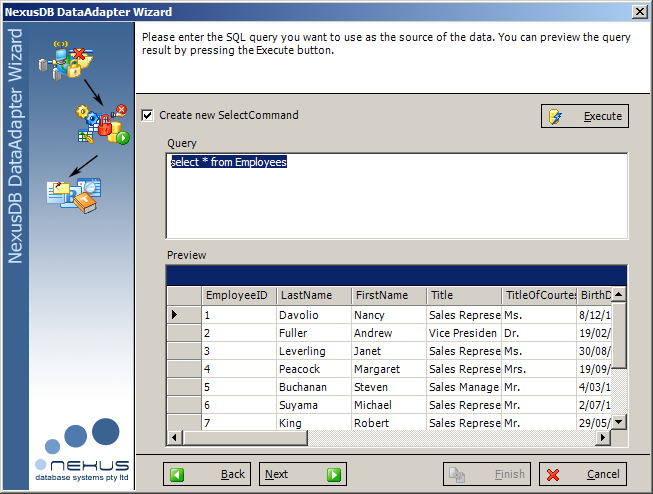
Step 4 - Creating the data query
The next page on the wizard allows you create a new SelectCommand which is needed to execute queries to the database. For this example we simple enter
select * from Employees
into the Query field and press Execute. Your wizard should now look like this:
Again press Next to proceed.
Step 5 - Setting the key fields for creating the DML commands.
For our application to be able to change data, we need to tell the DataAdapter, how it can uniquely identify a data record. This can be done by selecting the correct Field(s) on this page of the wizard.

You can also disable the creation of certain or all DML command classes.
By default the created Connection and Command components will not be visible on your form, but you can change this by unchecking the according check box. For our example we leave all the check boxes checked and tick the EmployeeID field as it is our unique record key. Press Next.
Step 6 - Creating the data access components
The last step in the DataAdapter wizard is to specify if and where to create the DataTable component for accessing the data. We leave all the settings as they are to create a new DataSet/DataTable component combo and press Finish. This will now create all the needed components on your form and hook them together.
Your form should now look similar to this.
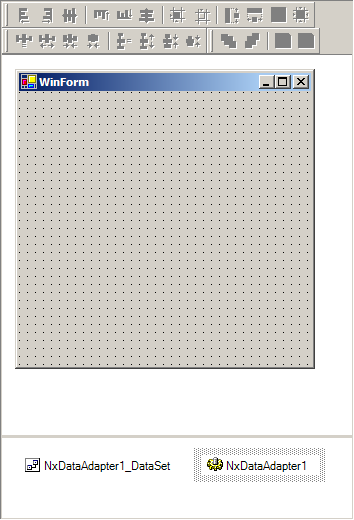
Note
Please note that you will by default only see the created DataAdapter and DataSet. All other components are hidden from the form, but can be accessed through the Object Inspector
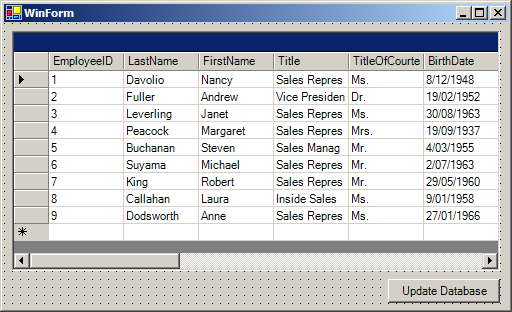
Step 7 (Option 1) - Manually adding the UI components
Next we will add a DataGrid and a button to the form. To hook the DataGrid to the actual data, select the grid in the Object Inspector. Look for the DataSource property and select EMPLOYEES from the drop down selection. Your form will now look like this:
Step 7 (Option 2) - Using the GUI Wizard to add data bound components.
For this select the DataAdapter on your form and press the right mouse button. Select the Create bound Controls option and the wizard will appear.
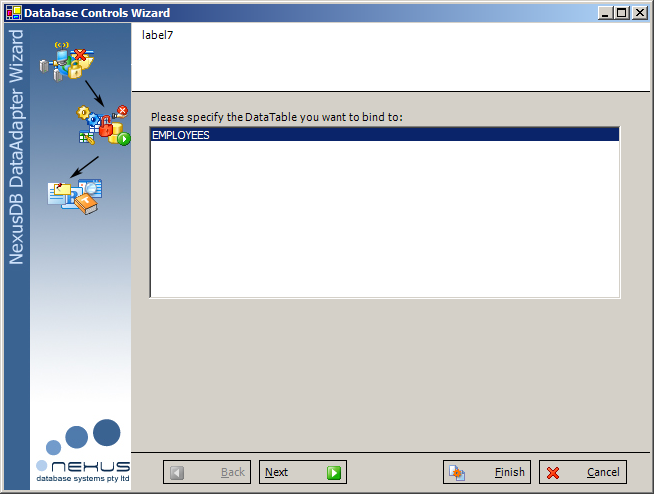
On the first page select the EMPLOYEES DataTable and press Next.

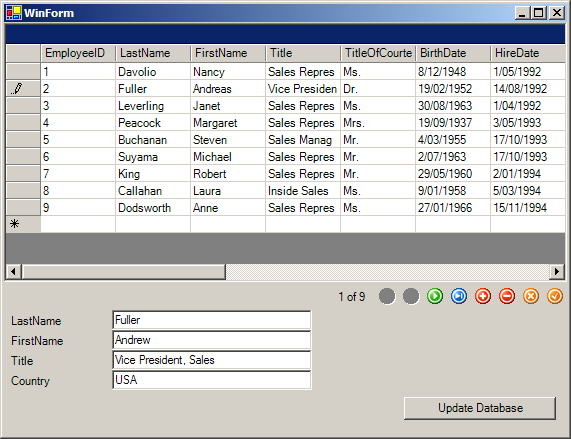
On the second page specify the fields you want to appear as separate edit controls and/or in a grid. You can also select whether you want a Navigator control created or not. Press finish when you're done and add an Update Database button to your form which should now look similar to this:

Step 8 - Filling the DataSet and saving the changed data
As a last step before finishing the application we need to add two event handlers. First we add a handler to the forms load event in which we add
nxDataAdapter1.Fill(NxDataAdapter1_DataSet, 'EMPLOYEES');
This line will on start of the application set the connection to active, execute the select command and fill its result set into the DataTable EMPLOYEES.
The second handler we add is to the click event of the button. The code is
nxDataAdapter1.Update(nxDataAdapter1_DataSet, 'EMPLOYEES');
This line will execute the Update, Insert or Delete command for each row we change in the application.
Step 9 - Compiling and Running the application
That's it. Compile the application and run it.
Questions? Problems?
- Interested to buy but something put you off?
- Can't find what you're looking for?
- Have a suggestion?
Let us know. If you're having trouble contacting us, please check here.


Site Updates
- May 27 2025 - 2:55pm
- May 14 2025 - 12:32pm
- Mar 19 2025 - 9:52pm
- Mar 14 2025 - 11:23am
- Mar 13 2025 - 11:42pm